It’s been a long time since I wanted to build a ball lifter, the “ball contraption system” like the ones built with the popular Lego Technic parts. I wanted to show that the Totem parts are very well suited for this kind of building, as with Totem parts you can make rather large and sturdy constructions.
Another reason that motivated me to construct this mechanism was that I met Mr. Pietro Amodeo from Istituto di Chimica Biomolecolare in Italy, when attending the Maker Faire Rome in 2019. He needed a mechanism to lift for an exhibition model he was making. The balls would symbolize a molecule, that illustrated how the human tongue tastes different molecules.
All “ball contraption” systems will always have ball-lifts as central components in the overall system. I have been inspired by websites like Planet GBC, which is a central hub for such GBC enterprises. In this text, I will shorten a “ball contraption system” as a “GBC”.

There is quite a large community out there making ball contraption gigs, using Lego Technic. This gave me an inspiration to start making a GBC module myself.

Here is an example of a lift using Lego Technic.
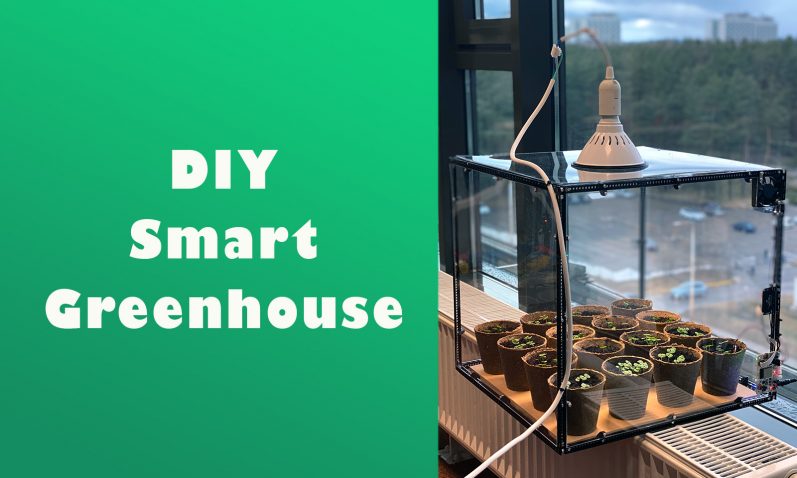
Totem Ball Contraption Mechanism

My first design of a Totem ball contraption mechanism, a two-stage lift construction.
There are so many ways to construct a lift for balls. That’s the fun of it also, because I believe it’s not about to make the most economical and efficient method to transport a ball up against gravity, it’s also about making a surprising or fun-looking mechanism.
The gravity will easily transport the ball down, it’s easier to make a going-down module in a GBC.
My lift is designed to lift the ball from almost ground level. So, I made 2 very different modules and connected them. The first module that takes the ball from ground level, I call the Step Lifter. Just to have a name, maybe there is a better word for this kind of construction.
I’ve started with constructing a ball lift, that lifts a ball up to about 60-70 cm height, when the ball is approximately 60-65 mm in diameter.
Find a detailed video of Caterpillar Ball Lifter mechanism here:
Philosophy behind
Before getting to the construction part, I’d like to explain my philosophy when making more complicated models. I want them to look good enough, and I get much pleasure in making 3D printed parts and then use them together with Totem parts. It’s so easy to fix 3D parts to beams, brackets and boards from Totem. I mainly screw them into the Totem parts with a 6 mm M3 bolt.
By designing 3D printed parts that connect to Totem parts, I can find out if some of the parts I design to be 3D printed, can later become part of the standard range of moulded ABS Totem parts. It’s often the way how we develop the Totem system further. Totem parts that are produced in larger quantities are plastic injection moulded, but investments in tooling for that is high.
I started the design of the caterpillar style Ball Lift, not the Step Lifter. So I started to make a large caterpillar gear and the links in the caterpillar belt.
To get the low friction in both the gear and links, I fitted the large gears with ball bearings, like I had used successfully in e.g. the Totem Spider. In the links I used nylon stand-offs to be the part touching the large gears. The nylon cylinders have little friction and will last a long time.
Once I have designed the caterpillar parts, I suppose I can use the same parts in other models, maybe a belt driven vehicle?
Construction

The big belt-gears are a combination of beams and strip brackets together with 3D printed gears and hubs (see the drawing above). I connect all parts together with M3 bolts, standard bolts from the Totem assortment.
I used a pair of strip brackets as central axle, so that the whole gear will have torsion transfer through the rather small hole in the ball bearings.

Details from the bearings inserted into 3D printed parts. Note that I simply fix Totem Beams with a 6 mm M3 bolt to the large gears.
Then I needed to make the belt so it didn’t have too much friction, also that it’d be easy to attach parts to the links. Below is my design how it turned out.

The blue parts in the left image above shows the parts I designed for 3D printing. The white cylinders are nylon stand-offs bought at Aliexpress. They are 10 mm height, 7 mm diameter, 3 mm inner diameter. These nylon cylinders are encountering the links and large gears.
I use a 4 cm Totem Beam for each link, to give the belt width, and to be able to easily fit other parts to the belt.

The parts, which are grabbing the ball and lifting it up, I’ll call the “scoop”. It’s also partly 3D printed and made in a way to be easily used with Totem parts like strip brackets for the “teeth”. I use 2x 6 mm bolts to fix the scoop to the belt beams.
The “Step Lifter”
The next module I designed was the Step Lifter. It was designed to take the ball from almost ground level up to the level the Belt Lifter could take over. Because the scoop of the belt lifter had to go under the caterpillar belt on the downside, it can’t grab the ball from the ground.
It also looks cooler with 2 modules together. This project is also about making it look cool when it operates!

The 3D printed gears that lift the cradles up and down are coloured blue in the image above. They make the cradles go up and down, travelling 4.79 cm in a locomotive manner.

I also use the same bearings again for the gears. See the image above (parts in black this time). This should make the operation be going without much wear for a long time. It also makes it quieter.

Then I went for a design of the cradles that holds the balls. I chose to make some 3D printed parts that fitted the board plate to vertical strip brackets. The reason I decided to 3D print this, was that it made it easier to have the cradle slide inside Totem beams, up and down in a steady position. The 4 vertical “rods” fit inside the Totem beams channel.

In the image above, the “sliding brackets” are coloured blue. Also note that the board is slanted slightly to the back, so the gravity makes sure the ball will be delivered to the next step.
The connecting slide
Between the 2 lifts, I designed a slide, so the ball will be delivered from the Step Lifter to the Caterpillar Lift. I wanted it to use as little height-loss as possible, to increase overall lift-height. But between 1-2 cm is needed for the ball to gravitate by itself.
It picks up some speed from the Step Lifter, but if more balls are queuing up in the slide, there should be enough tilt for the balls to roll by themselves.

For this purpose, I’m using heavily geared motors. A motor is rated 10 RPM / 12 V. It’s a 37 mm standard DC motor, bought on Aliexpress.
When motors are so low geared, they are also very strong. Since it’s slow, more Scoops can be attached to the caterpillar belt to get the balls lifted more frequently.

What’s next?
After this design, I should, of course, make some sort of roller coaster action that takes the ball from the top of the lift, down into the entrance again. I must think of something cool- looking.

Something like the image above, taken from Lego Arnau blog post.
The balls must do some interesting moves falling along the downward path.
Construction resources
If someone wants to build something from this design, all the documentation and downloads are available for free here.
For the design itself, you should use Sketchup to look at the design files. You can then duplicate the build, or even change and custom design it for your needs.
For 3D printing we’ll have the Sketchup files, and also STL files downloadable. We can provide GCode files for PRUSA printers.


You can find the files here.
Lars Øvrum,
The idea author of Totem